Git for the .NET Developer: Part 3–Setting up Git Environment for Windows (Powershell)

You installed the Github for Windows application and can now point and click to work with Github repositories, but it becomes only a matter of time till you realize a GUI is not going to cut it. Your next thought after realizing this varies based on who you are, but in any case, you need to know that in order to take Git seriously in the Windows environment you are going to have to go command line. Yes, I know and sympathize with the sighs and feelings of intimidation. But this is a great opportunity to learn a powerful version control system and an awesome excuse to jump into PowerShell. So to hurdle the obstacle of getting started, this post is about how to setup your PowerShell environment to work with Git before introducing core concepts and commands.
First, you will need to install msysgit. This will install all core utilities needed to work with Git. You will find the install here:
NOTE: When installing go ahead and have the installer add commands to your system path so you can call “git” via command line.
If you installed Github for Windows, Msysgit is iactually already installed in the AppData directory for the application and is what is used under the covers. However, the path to the msysgit install is dynamic because it is a click once application and it automatically updates with different versions.
Next, you should install Posh-Git. Posh-Git is a PowerShell module that provides some nifty Powershell to Git integration. For example, it will show if you have commits that are ready to be pushed, the current branch you are in, and also offers tab completion. The easiest way found to install Posh-Git is to run psGet while in PowerShell. Here are the steps to do so:
- In PowerShell, you will need set your execution policy to be able to run scripts. As an Administrator, run Get-ExecutionPolicy and if you don’t see “RemotedSigned” or “Unrestricted” then run:
Set-ExecutionPolicy RemoteSigned
- Now you are ready to install Posh-Git. Still within Powershell, run the following commands:
(new-object Net.WebClient).DownloadString("http://psget.net/GetPsGet.ps1") | iex
install-module Posh-Git
- You should be setup now with Posh-Git, but to double check run the following in Powershell
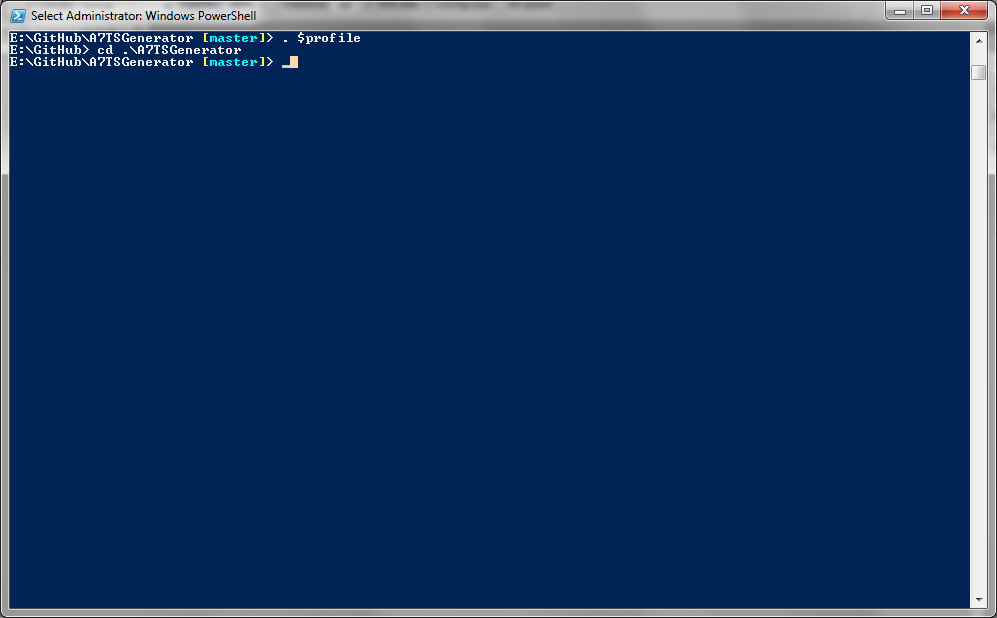
ii $profile
- This should open up a text file which is your PowerShell profile. This file contains the commands that run every time you start up a PowerShell session. You want to check that you are loading the Posh-Git module and should see a line in the file that looks like this (If not, be sure to add this).
Load posh-git example profile
. [Path to Documents]\WindowsPowerShell\Modules\posh-git\profile.example.ps1′
One other note, is that if you didn’t add the “git” command to your system variables you should add the command to your profile by adding the line $env:path += “;” + “[Path to Program Files]\Git\bin” prior to loading the Posh-Git command.
If you now navigate, to a Git repository in PowerShell you should now see the name of the branch highlighted in the PowerShell Prompt. If this is not the case, you should reload you profile by running the command “. $profile” or closing/reopening PowerShell.
The next steps are optional and relate to hooking into Github.
[Optional] Now it is time to setup the SSH Agent so that you can use SSH keys to pass your credentials to a remote repository (e.g., Github). This step is optional and essentially is for efficiency. Without the SSH agent you will be prompted for credentials every time you push commits to the central remote repository. The SSHAgent is installed with Posh-Git and the way it works is that you provide a Pass Phrase at the start of your PowerShell session to verify your identity and then Posh-Git (via the SSH Agent) will then handle authenticating you from there on out (i.e., no typing in your username/password every git push you’ll run).
Before you can do anything you will need generate your SSH keys and setup SSH keys in Windows. For Github, you can find a nice set of directions here https://help.github.com/articles/generating-ssh-keys.
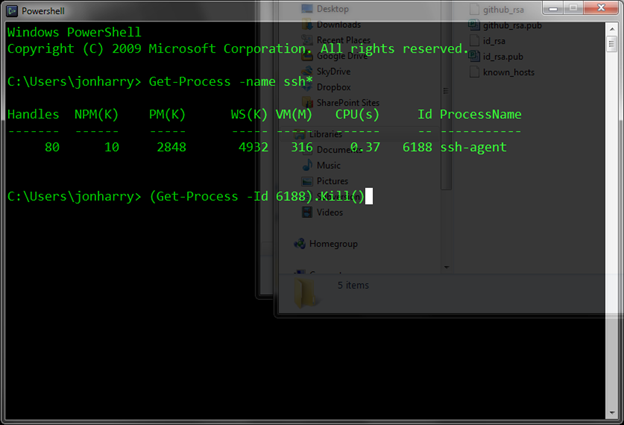
After setting up the SSH keys, you may find that you are still being prompted for your username and password if you run git push. The problem is that if you didn’t have the directory C:\Users[your account].ssh\id_rsa setup when you started your PowerShell session, then the ssh-agent is not working for you. So you will need to kill the ssh-agent process and let it re-run to catch your pass-phrase.
So first find the process “Get-Process -name ssh*” and note the Id column for the Process Name “ssh-agent”
Now you can kill the process with the command “(Get-Process -Id [associated id]).Kill()”
Make sure you Connect to your Repo via SSH. There is one more item to make sure your repository is using SSH for connecting to Github (or other remote Git service providers), otherwise, you will still get prompted for your username and password. Go into the root directory hosting your repository and navigate to the configuration file “.git/config” (NOTE: may need show hidden files/folders) and make sure your remote (“origin” by default) is configured to point to git@github.com:[source] rather than https://github.com/[source]
For example…
[remote "origin"]

fetch = +refs/heads/*:refs/remotes/origin/*

url = git@github.com:jonharry/Source.git
Hopefully you are now all setup to use Git in PowerShell. If you are setup, then you are halfway there to using Git. The next thing you need to know are the core concepts behind Git and the handful of your go-to commands that will get you started. The next post will introduce this.